OBS Studio Logo

OBS Studio 28 Released – Should you upgrade?

Should you update to OBS Studio 28 Now?

TLDR: NO! Unless…

OBS Studio 28 is a MASSIVE update.  This is a great release and advancement in the Open Source platform. Why do we say NO on updating right now? The issue revolves around the Qt 6 which handles the User Interface. This needed to be updated and great that it happened. Some of the side effects of this update can impact some of your current active OBS Systems and actually stop them from working.  For example; Qt 6 will no longer work on the following operating systems so if you have one of these, OBS Studio 28 will no longer work on these systems:

  • Windows 7
  • Windows 8
  • macOS 10.13/10.14
  • Ubuntu 18.04
  • All 32 Bit operating systems

Although this is a disappointment and likely to cause short term pain for many active OBS Studio users, this change should help open up major advances in OBS development for years to come.


Another issue when it comes to the Qt 6 Update, even if you don’t use one of the above operating systems, there is a need to make sure you get any plugins you use updated for Qt 6 if appropriate. Some of the big ones here are OBS-NDI. The current 27.x versions of that plugin use Qt 5 UI elements and will not load with OBS 28.

Our recommendation is to hold off on your update for a little while to let all the plugins and operating systems to stablize. A quick change now can shut down your production system, so make sure you experiment on a test configuration.

OBS Studio Logo

OBS Studio 27.1 Released

OBS Studio 27.1 Released - Should you upgrade?

OBS Studio 27.1 Released! The OBS Studio Team and community have released version 27.1 of OBS Studio. Should you upgrade? Well what is new?

Features:

  • Added YouTube integration
    • Allows the ability to connect your YouTube account without using a stream key
    • Adds various features when setting up your stream that allows you to set settings for each stream: your stream title, description, privacy settings, scheduling streams, and more
    • YouTube streams are created and managed via a new “Manage Broadcast” button next to “Start Streaming”
    • Also features a chat dock for public and unlisted broadcasts (currently read-only) 
    • Bandwidth testing is now supported in the Auto-Configuration wizard when logged in
    • Special thanks to the developers at YouTube for working with us directly on the initial implementation of this feature and helping to make it a reality
  • Added an 18-scene multiview option
  • Added a “Mask Only” option to the stinger track matte
  • Added a feature to browser sources to allow limited control over OBS, which must be explicitly granted by the user
  • Added an option to draw safe areas in the preview (same as the safe areas in the multiview)

What modifications did they make?

  • Added performance fixes for Windows 11 and Windows 10 Insider builds
  • Names for displays on macOS Display capture are now human readable names 
  • Auto-Remux now works with Replay Buffer
  • Optimized the media source, reducing unnecessary CPU usage
  • The missing files dialog will now detect missing files for stingers as well
  • Remove “Enter Fullscreen” from the menu on macOS because macOS already has a builtin fullscreen mode interface option
  • Sources that are invisible/hidden will now have their text dimmed as well in the source list
  • Added a “Missing Files Check” menu item to the “Scene Collections” menu
  • Added source icons to the source toolbar
  • Image sources that use gif files now will animate in preview when using studio mode
  • Enabled Alpha option in the Freetype 2 Text Source’s Font dialog
  • Added the ability to disable the Missing Files dialog using a startup flag
  • Added Ctrl+R on Linux and Cmd+R on macOS to reload browser panels
  • Re-enabled drag & drop for scenes & sources on Linux
  • Minor UI improvements to various areas, including Source Toolbar, Transform dialog and more
  • Improved internal behaviour in the game capture source to avoid unnecessary re-hooking
  • Wayland capture sources are now available without having to pass custom parameters to OBS from the command line

Bug Fixes:

  • Fixed a bug on Wayland on Linux where the cursor would capture slightly mispositioned
  • Fixed a bug with Dynamic Bitrate that would cause it to malfunction when used with hardware encoders
  • Fixed a bug on Wayland where capture methods (ie window/desktop) that weren’t fully supported would appear anyway
  • Fixed a variety of colour-related bugs in window capture and browser source
  • Fixed a bug where track matte stingers would flash previous frames sometimes
  • Fixed an issue where the projectors would list incorrect resolutions for DPI-scaled monitors
  • Fixed a crash on exit that could occur when using 3rd party plugins that hold references to sources with audio monitoring enabled
  • Fixed a bug where the Game Capture source would occasionally still capture overlays with the “Capture third-party overlays” option disabled
  • Fixed a bug where keyboard interaction did not work correctly on macOS
  • Fixed a bug where the replay buffer could crash when plugins interact with it 
  • Fixed an issue where the mask/blend filter looked incorrect on version 27 
  • Fixed a bug where deleting a scene that’s used as a source wouldn’t Undo/Redo properly 
  • Fixed a bug where the Auto-Remux would pop up blank sometimes
  • Fixed a bug where performing a redo for creating sources would cause sources to be created in the wrong scene
  • Fixed the “Deactivate when not showing” option in the Decklink source not working properly
  • Fixed a bug where themes were unable to use previously defined palette variables
  • Fixed log viewer taking up unnecessary extra memory when closed
  • Fixed a crash that could occur when exiting OBS with decklink output active
  • Fixed an issue where saving screenshots or the replay buffer would fail if the output filename format contained a directory path
  • Fixed a crash that could occur when a connection was dropped during the Auto-Configuration Wizard’s bandwidth-testing stage
  • Disabled “Network Optimizations” when using RTMPS because of incompatibility
  • Fixed an issue where setting a zero second auto reconnect delay would cause OBS to stop responding if disconnected

Our Recommendation

This is a minor update with some new features and modifications that many people will benefit from by installing. If you see a feature of modification you like, then certainly upgrade. Many will like the better YouTube integration.

We recommend testing your live configuration as a Portable OBS Install with the newer version before going live. Please let us know if you would like instructions on create a Portable Version of OBS for testing of updates and PlugIns.

Control PTZ Camera within OBS

Add PTZ Controls Dock To OBS Studio | PTZ Control for OBS | Great PTZ Hack

Add PTZ Controls Dock into OBS Studio | PTZ Control for OBS | Great PTZ Hack

Add PTZ Controls Dock To OBS Studio! In this short video, we will cover how to add PTZ Controls Dock to your OBS Studio set up. The PTZ Controls Dock will support any number of cameras and allows setting and recalling of presets as well as manual control of the PTZ features of your Jimcom PTZ Camera.

This plugin uses VISCA-over-IP to control the camera connected to your local area network. A serial cable is also supported but not covered in this video.

Tip URL to all of OBS Studio’s Resources:
https://obsproject.com/forum/resources/

The PTZ Controls Plugin:
https://obsproject.com/forum/resources/ptz-controls.1284/

The PTZ Controls Download Link:
https://obsproject.com/forum/resources/ptz-controls.1284/download

Remember that your Jimcom PTZ 20X optical zoom camera will use Port 1259 for VISCA-over-IP, please make sure you use this port value during set up.

UPDATE: If you have recent Firmware update for the NDI PTZ Camera, please use the recommended UDP Port 52381 during set up.

The Camera used in this video was the Jimcom NDI PTZ 20X Optical Zoom Camera:
https://www.jimcom.us/product/jimcom-ndi-camera-20x/

OBS NDI Set up for beginners

OBS NDI Set-Up for Beginners

OBS NDI Set-Up for Beginners

Default OBS Installation location for ZIP file installation:

C:\Program Files\obs-studio


NDI Tools Download link: https://www.ndi.tv/tools/#download-tools OBS NDI PlugIn

https://obsproject.com/forum/resources/obs-ndi-newtek-ndi%E2%84%A2-integration-into-obs-studio.528/


OBS-ndi 4.9.x download location (Use above link to find the lastest version):

https://github.com/Palakis/obs-ndi/releases/tag/4.9.1

OBS NDI Set-Up

Adding NDI Support to OBS Studio will give you many more capabilities with your broadcast. This includes using low latency NDI Cameras as well as sharing screen captured content between multiple PC/MAC computers.

Please refer to the video on the left for complete instructions for the installation process. The links below will help you find the required downloads needed to get NDI functional on your computer. This process only has to be done once and can be done at your leisure.

NDI Tools – NDI.tv site – You will need to request the download link which NDI will email to you after your request. You will then need to install those tools. Mac & PC are supported by the NDI Tools.

To get the NDI Input Source for OBS Studio, you will need to install a plug-in. Download that plug-in and install to enable that capability. You will need to restart OBS Studio after installing the NDI PlugIn

OBS RTSP Set up

RTSP Set-up for OBS Studio

RTSP Set-up

How to add your Jimcom IP / NDI Camera to OBS as a RTSP stream?

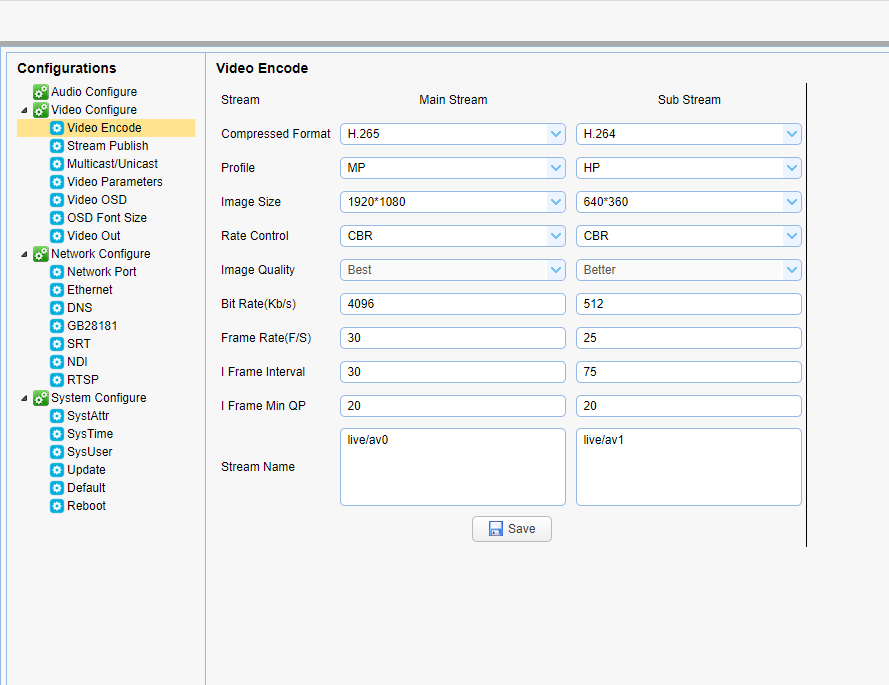
Within the Camera’s Web Interface, select:
Configuration -> Video Configure -> Video Encode

Configure the Main/Sub Stream the way you wish. Then note the “Stream Name” at the bottom, default is “live/av0” & “live/av1” respectively.

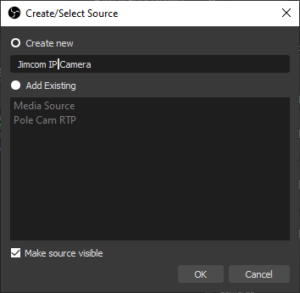
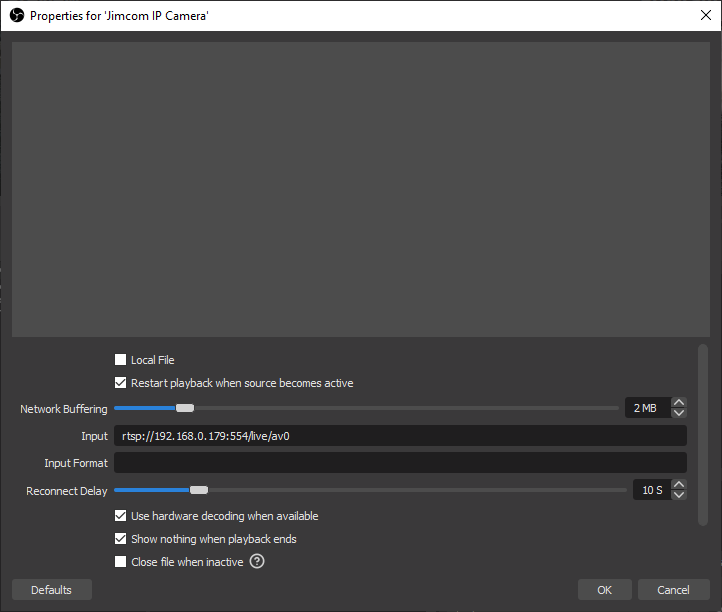
In OBS, select the scene you wish to add the RTSP source. Click the “+” in sources and Add a “Media Source“. Give the source a good name and click “OK“.

Add Media Source - OBS

Unselect “Local File” so “Input” shows. Enter the rtsp url in the following format:
rtsp://{IPADDRESS}:554/live/av[0|1]

In this example, the Main Stream is selected:

rtsp://192.168.0.179:554/live/av0

You should check “Use hardware decode when available” if you have a GPU in the PC, always safer to check this for performance.

Select “OK” and the source will be added to your scene.

Jimcom Video Encoding Configuration
Jimcom OBS Add Media Source RTSP Setting

Thats a RTSP Stream source.

OBS Studio Help / Tools

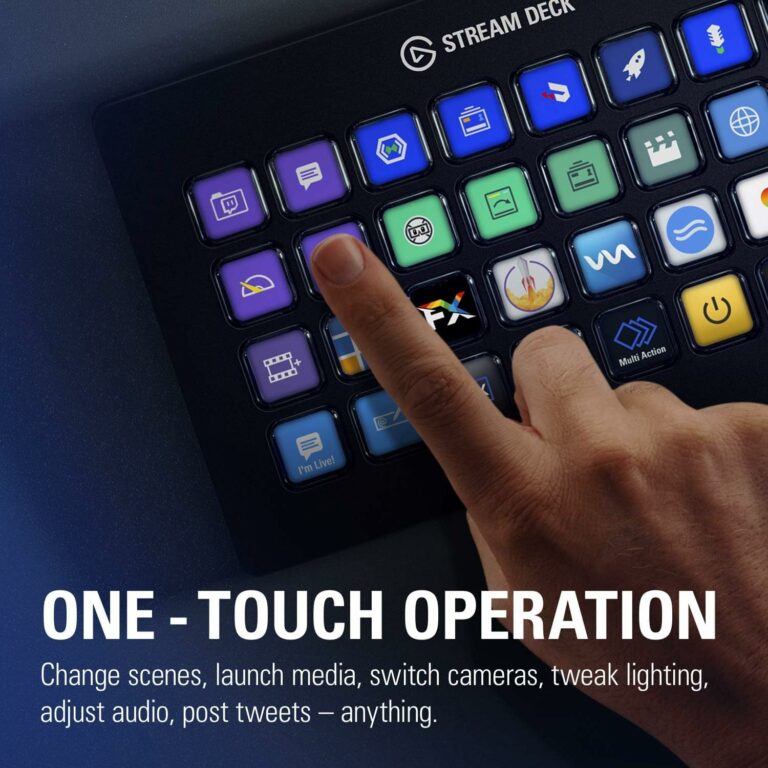
The Elgato Stream Deck is a powerful tool that greatly enhances the functionality of OBS Studio, a free popular streaming software. One of the key features of the Stream Deck is its ability to have customizable buttons that can be assigned to control various functions in OBS Studio. This allows streamers to have quick and easy access different features, saving them time and effort.

By assigning specific actions to individual buttons on the Stream Deck, streamers can seamlessly switch between scenes, making their stream more dynamic and visually appealing. For example, they can have one button dedicated to transitioning to their starting scene, another button for transitioning to their gameplay scene, and so on. This simplifies the process and ensures smooth scene transitions, enhancing the overall production value of the stream.

In addition to scene transitions, the Stream Deck can also be used to manage audio levels during the stream. Streamers can assign buttons to adjust microphone input levels or control desktop audio, allowing them to easily manage audio levels without having to navigate through different menus in OBS Studio. This eliminates the need for additional hardware or software, streamlining the audio management process.

Moreover, the Stream Deck’s integration with OBS Studio also enables streamers to control their camera settings. They can assign buttons to switch between different cameras or adjust camera settings such as focus, zoom, or exposure. This flexibility allows streamers to easily make adjustments during their live stream, improving the overall visual quality and professionalism of their content.

The synergy between the Elgato Stream Deck and OBS Studio has greatly improved the efficiency and professionalism of streamers. With just a touch of a button, they can switch between different scenes, adjust audio levels, and operate OBS Studio seamlessly. This allows for better multitasking during live streams as streamers can focus on engaging with their audience rather than getting caught up in technical aspects.

This integration has not only improved the workflow of streamers but also enhanced the overall streaming experience for both content creators and viewers. Streamers can now provide a more polished and engaging stream, while viewers can enjoy a stream that is free from disruptions or technical glitches. The Stream Deck’s customizable buttons have granted streamers more control over their OBS Studio functions, allowing them to deliver high-quality content with ease.

We are an Amazon Affiliate and might receive a small compensation from your purchase. We have no other formal relationship with Amazon.

OBS Sound & Audio set-up with Microphone and audio sources

Ultimate Microphone Guide for OBS Studio

OBS Microphone/Audio Setup

Ultimate Microphone Guide – Want to get the help of an Audio expert to get the perfect sound on your live stream with OBS Studio?

Try this video and setup your audio sound like it was setup by a Pro Audio Engineer. This is a simple set of instructions to get awesome audio from your free OBS set-up.

This professional sound is achieved by up to 5 OBS built in audio filters. The default settings are all that are needed with the exception of the “GAIN”.  They should be placed in this order:

  1. Noise Gate (Optional)
  2. Noise Suppression
  3. Compressor
  4. Gain (need to tweak to maximize audio level)
  5. Limiter


This Video is Critical for your audio quality.

Get started with OBS Studio

Get Started with OBS Studio

OBS Studio is the leading Open Source and Free Video Broadcasting software Packages. Use OBS with your Jimcom IP or NDI PTZ Cameras to get the most of your investment for your House of Worship, eSports, DJ & Music Production, or business broadcast.

A tool like this can easily get your local Town Government / Selectmen streaming to the town, Church streaming to its parishioners, eSports events out to fans, produce your next music video, or create a business video for market your product and services.

OBS Studio allows broadcasters to create scenes with multiple inputs on the same screen allowing picture-in-picture. This tool will help create professional broadcasts and bring in multiple guests/videos via different sources. There are move advanced features that can be enabled such as being able to change your video source order, rotate them, or even add filters.

With the addition of Plug-Ins, the main program can be extended beyond the base product. Jimcom USA recommends you add the NDI plugin to connect your cameras via a low latency for your broadcast. The OBS Studio 27 release has new feature such as Undo/Redo, Improved Display Capture for Laptops, Missing Files Dialog, Source Visibility Transitions, and many more improvements. This project is community support and new features and add-ons are being created all the time.

This tool can even be run as a Portable Application. This enables having OBS on a thumb drive and able to get started on almost any PC with no installation. It also facilitates multiple “versions” of OBS with different plugins and configurations if your site needs different styles for different equipment, etc.